session one
agenda
- introductions
- course information & administration
- setting up your webspace
- your first web page
- advice for new web developers
- assignment one
- readings & resources
introductions
- instructor: Dave Tanchak
- email: see sidebar
- web site: you're soaking in it
- all about you...
- your name
- your background
- what is your interest in the subject?
- what do you hope to achieve in this course? Be specific!
- do you have any previous experience?
about the course
- objectives:
- provide an overview of web development and design
- impart skills in the use of HTML, CSS, interface design, introductory scripting and advanced mark-up techniques
- provide resources and suggestions to go further
- format:
- class duration is 3 hours, 6:30 - 9:30pm using Teams/Class
- students are required to be actively online during the lecture section of each class.
- lecture, in-class exercises, code walkthroughs, examples and discussion
- 10-15 minute break
- 30 minutes of lab time when/where appropriate
- readings:
- supporting online resources
- optional textbook readings
- assignments:
- four (4) small assignments to be handed in throughout course (20%)
- two (2) small projects aimed at maintaining some personal pages on your bcitwebdev.com account (20%)
- one (1) major project - fully-functioning web site (25%)
- midterm (10%) & final exam (25%)
- midterm in session 6
- final exam in session 12
- official learning objectives
student account setup
Each student receives personal webspace. This space is exclusively yours, with your own username and password. You will need to use a File Transfer Protocol (FTP) client (e.g., Filezilla) to move your files between the server and your local work station.
- You need to be aware of the following information:
- username - your myBCIT username, e.g., szhang346
- password - this has been created for you; your instructor can remind you if you forget
- directory name - same as your myBCIT name (see above)
- Your URL will be:
https://students.bcitwebdev.com/[your_mybcit_user_name] - take a moment to visit the URL for your webspace to ensure it exists; let me know if you have any issues
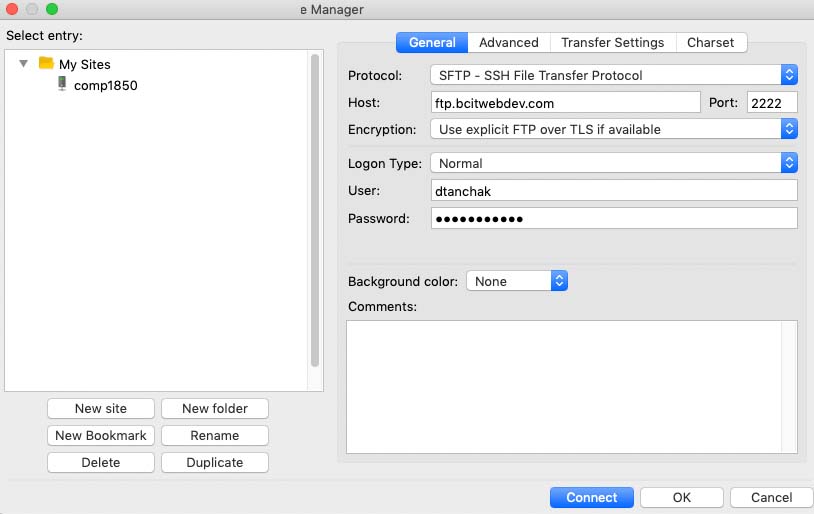
use ftp to connect to your account
- Launch FileZilla from your Start Menu (choose All Programs and locate FileZilla in listing).
- Select File > Site Manager
- Click on New Site in the bottom left corner of the dialogue box. The New Site will appear in the window above; rename it COMP 1850 or mysite or something similar
- Protocol: SFTP - SSH File Transfer Protocol
- Host: ftp.bcitwebdev.com
- Port: 2222
- Logon Type: Normal
- User: [your_username] - i.e., the one you received from instructor
- Password: [your_password] - i.e., the one you received from instructor
- Click Connect (bottom)
getting started with hypertext markup language (HTML)
- foundation of WWW documents
- co-ordinates the display and layout of all elements: graphics, text, audio, video, etc.
- a system for describing documents: a set of codes which "mark up" an unformatted piece of text telling the "reader" (web browser) how to display the information
- set of elements, commonly referred to as "tags"
- tags tell a browser what to do with a particular piece of information
- may help to think of most elements as containers (
<strong></strong>), or boxes within which you can place various information - rules for where tags can go, and how they are formatted:
- hierarchy: there are parent/child relationships for tags
- syntax: avoid "mixing" your tags:
<strong><em></strong></em> - spacing: browsers ignore extra space - use tabs and extra line breaks to format your code so that you can understand it
- attributes: some tags have attributes, which in turn have values (contained in quotations):
<tag attribute1="value1" attribute2="value2" attribute3="value3">
- structure: organizes content in a predictable fashion, ensuring different user agents (web browsers) will be able to display content consistently
- semantics: applies meaning to online content, to improve performance with search engines, screen readers, and other accessibility devices (and, ultimately, users).
basic HTML document tags
Web pages must follow a particular structure. In order to be valid they must include the following document tags:
-
<!doctype>- identifies file as HTML, and the "dialect" of HTML being used-
<!DOCTYPE html>
-
<html lang="en">- tells browser that the file contains HTML-encoded information; reinforced by file extension ".html" or ".shtml" etc.
- should include language attribute to help screen readers, search engines, spell checkers, etc.
-
<head></head>- child element of the
htmlelement; sibling element of thebodyelement
- child element of the
- tells the browser important information about the document body
- several things can go into head:
<script>,<style>,<meta>
<meta charset="utf-8">
- child element of the
headelement - tells the browser to use Unicode for character encoding - it handles the cosistent encoding (display) of almost 150,000 characters from over 160 modern and historic scripts, plus symbols and even emojis!
- note that
<meta>is a void or "empty" element – there is no end tag (i.e.,</meta>)
<title></title>
- child element of the
headelement - displayed in browser window but not in text area
- top level for search engines
- no longer than 64 characters in length
<body></body>
- child element of the
htmlelement; sibling element of theheadelement - contains the content of the document; displayed in text area of browser
- has attributes which help define the appearance of document
saving files
file name conventions
HTML code is written as a text file. When saving, use conventional names for your files to maximize the portability of your code.
DO:
- use alphabetic characters
- use numbers
- use underscores, dashes
- be descriptive
- use an .html extension (for now)
DON'T:
- use spacebar spaces
- use special chars ...!@#$%^&... etc.
- use UPPERCASE characters unless absolutely necessary
standards based development
- the World Wide Web Consortium (W3C) are the curators of the primary technologies of the web:
- HTML (for structure and semantics)
- CSS (style and presentation)
- Javascript (behavior)
- successful websites need to appeal to search engine algorithms and also must be easy to maintain
- requires following best practices in page design to maximize:
- compatibility (creating web pages that work well in all browsers)
- portability (writing code that works well in any computing environment/operating system)
- accessibility (produce web pages that are optimized for search engines, screen readers, etc.)
so how do we comply with standards?
- only structurally and syntactically valid code can be expected to behave predicatably in the many web browsers available
- errors in your code should be found and fixed before publishing your work online
- use the following validation services to ensure correctly coded documents
- if you cannot make sense of and fix an error, consult your instructor for assistance
some text formatting tags
- block elements (automatic line breaks):
-
<p></p>- Paragraph -
<h1></h1>- Level one heading (headings have six levels; try them out!) -
<blockquote></blockquote>- Indents text from both left and right margin; used for quoting blocks of text (for all you essay writers) - More on block-level elements
-
- inline elements: (no automatic line breaks)
-
<strong></strong>- Bold -
<em></em>- Italicize -
<small></small>- Legal disclaimers etc., displayed in small font size -
<sup></sup>- Superscript; small text above the baseline - More on inline elements
-
- Note: Block-level elements can have inline elements nested within and sometimes other block-level elements, but inline elements cannot contain block elements.
- Void (or empty) elements (elements with no content that don't have a closing tag):
-
<br>- Line break -
<meta>- Meta element allows you to add page-specific information like character sets -
<hr>- Horizontal Rule
-
- Technically, block and inline elements are no longer defined in HTML5 (see content categories), but the general guidelines outlined herein still apply. We will see that elements can belong to more than one category (e.g., a
<br>element is part of both the flow and phrasing categories).
attributes & values
- some tags don't work without attributes and values:
<a></a>,<abbr></abbr>,<img >
- attributes have values that communicate additional information about a tag to the browser:
- references to CSS classes for styling purposes
class="fancy" - a unique ID:
id="navigation"for styling or javascript purposes - more information about the content of the tag:
alt="A picture frame"ortitle="British Columbia Institute of Technology" - a link to another file:
src="http://www.bcitwebdev.com/lectures/one/picture.jpg"orhref="http://www.bcitwebdev.com/css/comp1_main.css"
- references to CSS classes for styling purposes
- all attributes must have values
- each tag has different allowable attributes (for example: the
<abbr>tag cannot use asrcattribute) - tags that don't need attributes can still have optional attributes
advice for new web developers
coding strategies
Listed here are several techniques which can help increase your efficiency and ensure you write valid, well formed HTML code.
- dont write too much code before testing in a web browser - it is easier to locate and fix problems when you test often
- when you write a new HTML tag or comment, write both the opening and the closing before filling in the contents. Some text editors support Auto Complete, which will do this for you
- write and test locally, on the client; only use FTP to upload files to the server after the page(s) are tested and completed
- ensure HTML files have the correct extension of
.html - ensure the file you are working on in the text editor is the same file you are testing in the web browser - it can be easy to get mixed up, especially when you may often be working with several different files that share the same name, such as
index.html, so read and compare the entire path displayed by both editor and browser to ensure the file is the same - all files and folders must comply with good naming conventions: this includes Case Sensitivity. adopt a standard and stick with it, such as: all file and folder names are lowercased with underscores instead of spaces to separate words
- comment your code - use comments to visually separate sections of code within a page (header, footer, navigation, content). this makes your files much easier to maintain.
workflow
Settle on a procedure for getting you and your computer set up and ready to code, test and publish your pages. If you have difficulty getting started, consider adopting the following steps.
- if you are creating a new file:
- start the text editor
- choose File -> New to create a new file
- add to the file the tags that constitute the essential HTML template
- add text to the title tag, and add a small amount of content to the body tag
- using 'Save As...' choose a filename and location for the new file, save the file with an
.htmlextension
- start the text editor
- use File -> Open to browse and select the file you want to work with
- open the file in a web browser, confirm the browser displays the expected result
- add/refine the content in the text editor
- save the changes
- refresh the web browser
- repeat from step 3 until page is complete
- start the FTP client, connect to your web server
- upload the file(s) to the server via FTP
- use web browser to test the uploaded file(s) online
efficiency tips
- learn and use keyboard shortcuts for common tasks (for Macintosh, use the
Commandkey instead ofCtrl)- copy :
Ctrl+C - cut :
Ctrl+X - paste :
Ctrl+V - save :
Ctrl+S - browser refresh :
F5 - clean browser refresh (ensures the browser is not displaying a cached version of a page) :
Ctrl+F5 - etc
- copy :
- use drag and drop techniques to open local files in text editors and web browsers, its much faster than using the mouse to 'File -> Open -> Browse...'
- some IDEs (Integrated Develolpment Environment) include the text editor, browser testing and FTP client built in, reducing the need to switch between several applications during your workflow
assignment one
objective: Build and upload an index page for your bcitwebdev.com account.