session three
agenda
- adding images to your pages
- URLs and your directories
- html5 semantics
- introduction to cascading style sheets
- introduction to tables
- assignment three
- readings & resources
image references
- void element - cannot have child elements
- must include
srcandaltattributes - value for
srcattribute is treated the same as value for a hyperlink - can point to file in the same directory, another directory in the site, or another resource external to the site (don't do this) - usage:
<img src="movie-photo.jpg"> - primary attributes:
- source of image (
src):
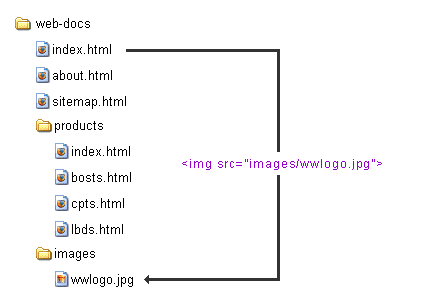
e.g.,<img src="images/movie-photo.jpg"> - alternate display (
alt):
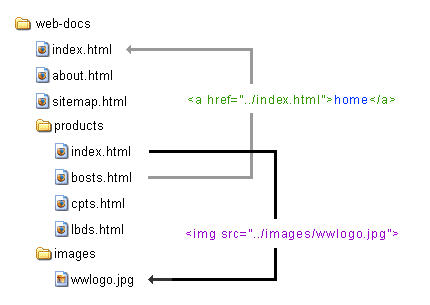
e.g.,<img src="../images/movie-photo.jpg" alt="alien vs. predator"> - dimensions (
width,height) in pixels:
e.g.,<img src="../../images/movie-photo.jpg" alt="alien vs. predator" width="600" height="400">
- source of image (
- why do we need to be specific?
- the more you can tell the browser about the structure of the document, the faster it will be served up to the user - and speed is crucial to this medium
URLs and your directories
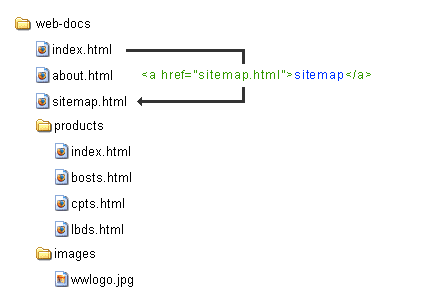
- files can be organized in different ways, and each way will have an impact on your URLs and how you link to them in anchors and image refrences
- linking within a single folder:

- relative file structure:

- segregated file structure:

exercise one: add images to the widgetwerks web pages
Use the notes above (and links below) to add images to the WidgetWerks pages. Download the session03.zip folder from the Learning Hub. The starting files are in the folder called 01_images_exercise.
- On every page, add the WidgetWerks logo to the top of the page. Make it a link back to the home page.
- On each page, somewhere near the top of the content, add in a reference to the image with the same name, e.g., partners.jpg goes with partners.html. Add home.jpg to your index.html file. Be sure to include the width, height and alt attributes for each image.
- On the stuff.html page, add the email icon (mail-32.png) to the page so it sits beside the email address we linked previously. make the icon a link to the email address shown (sell_me_some_crap@spiderweb.com).
HTML semantics
Using HTML semantically means choosing the tag that best explains the content's meaning. The more effective the semantic markup, the greater the accessability of the data: Search engines, screen readers, and the performance of other web reading devices will be enhanced with appropiate semantic HTML. In essence, don't use an HTML element because of how it makes the content appear (presentation), but how it identifies the type of content (structure).
- headings
- headings (
h1->h6) should be used to highlight the title of your document and show the structure of your document - usually precede content such as paragraphs or lists, and they ought to summarize the content that follows
- recommended that any
<section>or<article>element include at least one heading - every HTML page should have at least one
<h1>heading - use the lesser headings to imply relative importance (eg: a sub topic of the higher-level heading) - do not skip a heading level (eg: an
<h2>should not be followed by an<h4>) - most web users do not read pages online, they scan pages - effective use of headings will facilitate more effective scanning
- headings (
- paragraphs
- consist of one or more sentences related to a single theme or idea
- the
<p>tag should thus be used for blocks of textual content - if you have several, long paragraphs following each other, consider adding a heading or two to give the reader's eyes a 'place to rest'
- lists
- use unordered and ordered lists to collect together related items
- Unordered lists (
<ul>tag) imply no ranking of the points, but does suggest all points are related - The ordered list (
<ol>tag) will imply ranking by numbering the points in the order in which they appear
- HTML list usage
- A list tag,
<ul>or<ol>, can contain only one kind of child: one or more<li>list item tags - A
<li>tag may only be deployed if it is as a child of a list. The list item tag may have anything as a child (block or inline elements, other lists)
- A list tag,
- use these other elements, introduced with HTML5, to provide further meaning to the structure of your documents:
<section>is a tag representing a document or application section. In general, if you are planning to use a heading, start a newsection. Asectionmust contain a heading, and may containarticle, possiblyasideor even sub-sectionelements.<article>is an independent piece of content in a document (it could stand alone if removed from the page). Anarticlemight be a blog post, forum thread, news story, collection of product information, etc.<aside>is for content "only slightly" related to the main page content.asidefills the role of a sidebar. If the content could be removed without reducing the meaning of the main content of the HTML document, then use anaside.<header>and<footer>are for the header or footer of a page (go figure).<nav>represents an area for navigation.<main>is used for containing content that is focused on the central topic of the page. This content is usually unique to the page, and not shared by other pages (main will usually NOT contain navigation elements, footers, sidebars, etc.).<figure>will likely contain animgor graphic. self-contained content (could usually be removed from the page and stand on its own). Allows for captioning of embedded content like an image graphic or video. use only for figures that are discussed in the text of the page, do not use for images that are not related to the theme/topic of the page. Be sure to include a descriptivefigcaptionchild element.<figcaption>is used as first or last child offigureto define the caption or legend for a figure.
- allows for more flexibility in coding and specifying content
- replaces and reduces the need for many
divtags, e.g., instead of the typical<div id="header">, use<header> - having trouble deciding which tag to use for what content? Try this HTML5 flowchart
exercise two(a): adding semantic elements
Objective:
Add semantic elements to the WidgetWerks pages, using the above list as reference.
For each of the WidgetWerks pages, look for places to add semantic HTML elements, or replace existing elements where appropriate.
Use the files in the folder 02_semantics_css_exercise_begin.
introduction to cascading style sheets
- HTML is a structural language: pages are coded according to their logical structure - nothing to do with presentation
- style refers to the set of attributes applied to individual elements - essentially the elements of presentation:
- section head - bold, Verdana, green, 14 point
font-weightfont-familycolorfont-size
- CSS allows you to separate structure from presentation - why is this good?
- if you define a style called "sectionhead" you can apply that style to all section titles in a document or a site by applying that style
- if you suddenly decide that you want all the section titles to be blue, you change the style definition, not the individual structural tags
- very powerful if you have hundreds of pages!
- CSS is not HTML - separate code that enhances HTML by allowing you to redefine the way existing HTML tags work
how do style sheets work?
- cascading style sheets don't require any fancy software or plug-ins - just rules
- a CSS rule defines what the HTML should look like and how it should behave in the browser window
- three parts to a CSS rule:
- selector
- property
- value
selector {property: value;}= ruleselector- can be HTML, class or ID (see below){property: value;}= declaration- properties identify what is being defined: font-family, font-weight, font-size, color, etc.
- values are assigned to define the nature of the property: verdana, bold, 16pt, green, etc.
- three base types of CSS rules, as determined by their selector:
- HTML selector - the HTML selector (P, H3, etc.) is used to redefine how the tag displays:
p {font: bold 16pt verdana;} - Class - a "free agent" rule that can be applied to any tag at your discretion:
.introhead {font: bold 48pt verdana;} - ID - work like class selectors, but usually apply to only one element on the page:
#mainnav {position: absolute; margin-top: 20px;}
- HTML selector - the HTML selector (P, H3, etc.) is used to redefine how the tag displays:
- three places to define rules:
- in an external document that is then linked or imported into your HTML page(s); called an external rule
- in the head of a document to affect an entire web page; called an embedded rule
- in an HTML tag: in the body of the document to affect one tag only; this is called an inline rule
- this is the cascading part of CSS as you could, in fact, use inline, embedded and external rules together: an inline rule will override an embedded rule, which will override an external rule
applying style sheets to web pages
external styles
- setting up an external CSS file is a two step process:
- first, set up the rules in a separate text document and save it with a .css extension
- then, link the document to each page using the <link> tag:
				<head>

				   <title>document</title>

				   <link rel="stylesheet" href="filename.css">

				</head>
- rel="stylesheet" defines the link to a stylesheet
- href="filename.css" is the URL for the external file
- the major benefit of CSS is the external file: allows you to define all your styles for a site in one document, and link it to all pages
- changes to a style can be made once and affect all instances of the style throughout a site
embedded styles
- you can also create styles that apply to only one document, which is done by adding the following to your
<head>section:<style>
h1 {color: red;}
</style> - can manage style for ALL
<h1>tags in the document from ONE PLACE - you can also set rules for the document that override rules previously defined in an external style sheet (part of the cascade)
inline styles
- to set the style for an indivdual HTML tag (i.e., an inline rule), we use the following syntax:
<h1 style="color: red;">content</h1> - note that this approach should be used sparingly, as it amounts to adding presentational information to your HTML, which we try to avoid
exercise two(b): adding styles to web pages
Objective:
Add styles the various elements on the WidgetWerks pages, including headings and links.
Your instructor will walk you the creation of CSS rules to reformat the WidgetWerks pages.
We will continue to work with the files in the folder 02_semantics_css_exercise_begin.
introduction to tables
- semantically speaking, HTML tables should be used to display tabular data (product information, hockey team statisitcs, etc).
- markup behind tables is a bit tricky and not entirely intuitive:
- constructed in rows, but columns are implied by number of cells in each row
- a 3x3 table consists of 3 rows, but we must be sure to include 3 separate cells within each row for table to display as intended
- table cells can accommodate other block and inline elements much as
liitems can - structural table tags:
- There are numerous tags in HTML for working with tables, but only three are required for defining the structure:
<table></table>
defines a table. may only contain one or more<tr>as children.<tr></tr>
defines a row. may only contain one or more<td>as children. may contain table heading<th>tags instead of<td>. each<tr>in a particular table must contain the same number of<td>/<th>.<td></td>
defines a table data cell. may contain anything as children. must be the child of a<tr><th></th>
defines a table heading. should contain text description of the column, usually in the first table row. must be the child of a<tr>- a sample table:
<table>

                <tr><th>left header</th><th>right header</th></tr>

                <tr><td>middle left</td><td>middle right</td></tr>

                <tr><td>bottom left</td><td>bottom right</td></tr>

                </table>
<td> attributescolspannumber of columns this cell should spanrowspannumber of rows this cell shoud span
- table style conventions
- to maximize semantics, first table row should use table headings
<th>not table data cells<td> - text cell data floats to the left (default)
- if cell data is a monetary or numeric value, right align it using
text-align:right; - in tall cells, float data to the top using
vertical-align:top;
- to maximize semantics, first table row should use table headings
exercise three: working with tables
Use the notes above to help recreate the tables on this page (also located in the 03_table_exercise_begin folder).
- Once you've built the two tables successfully, save your page as table-exercise.html to preserve the original tables.
- Then, save the file as table-exercise-styles.html and use what you've learned about CSS to add the following additional styles to the tables:
- Change the background colour of the first table to green, and the second table to red (use ID selectors).
- Change the width of the first table to 600px; change the width of the second table to 75% (part of the same rules created above).
- Change the background colour of the third row in each table to blue and the text in that row to white (use a class selector).
- Change the background colour of cell three in each table to yellow (use a class selector).
- Use the
border-collapseproperty to remove the double border on both tables (add to the existing rule that uses thetableselector).
assignment three
Objective: Write, test, and publish a small website using semantic HTML pages styled with CSS and upload to your bcitwebdev.com account.